TreeviewCopyright © aleen42 all right reserved, powered by aleen42
Set up portal with WifiDog + AuthPuppy Back
- Router Firmware: OpenWRT/DDWRT
- Gateway: WifiDog
- Auth Server: AuthPuppy
Process between the router and the server
- Router: redirect to
/login?gw_id&gw_port&gw_address&url - Server: access
192.168.1.1/wifidog/auth?token - Router: redirect to
/auth?stage=login&mac&gw_id&ip&token - Server: return
Auth: 5 - Router: redirect to
/auth?stage=counters&mac&gw_id&ip&token - Server: return
Auth: 0orAuth: 1
Installation of AuthPuppy
i. Download AuthPuppy from https://launchpad.net/authpuppy
ii. Unzip the file
tar -zxvf authpuppy-1.0.0-stable.tgz
iii. Move authpuppy/ to /var/www
mv authpuppy /var/www/
iv. Change authority owner
chown -R www-data:www-data /var/www/authpuppy
v. Create mysql
vi. Create Apache/Nginx
- Website Path:
/var/www/authpuppy/web/
nginx setting:
server{
    listen 80;
    index index.php index.html index.htm;
    server_name authpuppy.soundtooth.cn;

    root /var/www/authpuppy/web/;

    set $subdomain "";

    if ( $host ~* (\b(?!www\b)\w+)\.\w+\.[a-zA-Z]+$ ) {
        set $subdomain /$1;
    }

    client_max_body_size 200M;

    location / {
        try_files $uri $uri/ /index.php?q=$uri&$args;
    }

    error_page 404 /404.html;

    error_page 500 502 503 504 /50x.html;

    location = /50x.html {
        root /usr/share/nginx/www;
    }

    # pass the PHP scripts to FastCGI server listening on 127.0.0.1:9000
    location ~ \.php$ {
        # With php5-fpm:
        fastcgi_pass unix:/var/run/php5-fpm.sock;

        fastcgi_index index.php;

        fastcgi_param  SCRIPT_FILENAME    $document_root$fastcgi_script_name;

        #fastcgi_param SCRIPT_FILENAME /var/www/$domain$subdomain$fastcgi_script_name;
        include fastcgi_params;
    }
}
vii. Open http://authpuppy.soundtooth.cn/ to start installation
Create a new node for a router
Login to authpuppy to create nodes for each router:
- Name
- gw id: Gateway id
- Deployment status: deployed
- Optional
Configuration of routers
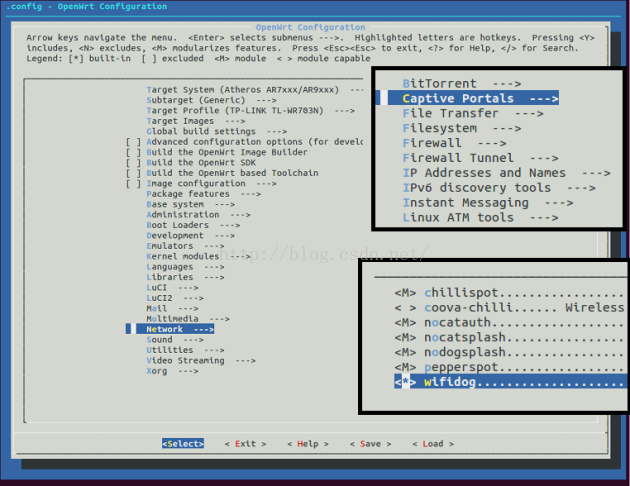
i. Install WifiDog
- OpenWRT:
opkg install wifidog
Notice that: if your firmware does not have the package wifidog, you should re-build one. And choose wifidog in Network -> Captive Portals after make menuconfig.
- DDWRT: has been installed by default
ii. Configure WifiDog
# vim /etc/wifidog.conf
AuthServer {
    Hostname auth.blackmagic.science
    SSLAvailable no
    Path /
}
iii. Start WifiDog
/etc/init.d/wifidog enable

# or

/etc/init.d/wifidog start
As the plugin is integrated with a code management system like GitLab or GitHub, you may have to auth with your account before leaving comments around this article.
Notice: This plugin has used Cookie to store your token with an expiration.