TreeviewCopyright © aleen42 all right reserved, powered by aleen42
Docker Back

其他語言
目录
1. 安裝
- i. 在超級管理員權限下登錄Ubuntu, 或者用
sudo執行命令 ii. 保證你已經安裝
wget- 檢測方式
$ which wget - 如果
wget沒有安裝, 則在更新安裝包管理器後安裝wget$ sudo apt-get update $ sdo apt-get install wget
- 檢測方式
iii. 獲取最新的docker安裝包.
- 系統會索取你的
sudo密碼. 然後, 它會下載並安裝Docker及其依賴包.$ wget -q0- https://get.docker.com/ | sh - 提醒1: 如果公司使用了代理服務器, 那麼你可能會發現安裝過程會出現
apt-key命令出錯. 為了解決問題, 直接通過下面的命令來添加這個鑰匙:$ wget -qO- https://get.docker.com/gpg | sudo apt-key add - - 提醒2: Docker目前只支持64位系統
- 系統會索取你的
iv: 確保
docker安裝成功的方法:$ docker run hello-worldUnable to find image 'hello-world:latest' locally latest: Pulling from library/hello-world 535020c3e8ad: Pull complete af340544ed62: Pull complete Digest: sha256:a68868bfe696c00866942e8f5ca39e3e31b79c1e50feaee4ce5e28df2f051d5c Status: Downloaded newer image for hello-world:latest- 下面這條消息表示你已經成功安裝
Docker.Hello from Docker. Docker通過了下面的步驟來顯示這條信息- Docker客戶端連接了Docker虛擬機.
- Docker虛擬機從Docker Hub上拉"hello-world"的鏡像到本地.
- Docker虛擬機通過這個鏡像創建一個新的容器, 並通過這個容器運行可執行文件從而產生數據流.
- Docker虛擬機把消息數據流發送到Docker客戶端, 然後由客戶端把消息顯示在終端上.
如果想嘗試更野心的東西, 你可以通過下面的指令來運行一個Ubuntu容器
$ docker run -it ubuntu bash- 通過一個免費的Docker Hub帳號, 分享鏡像, 自動化工作流或其他東西: https://hub.docker.com
- 更多例子和想法, 請瀏覽: https://docs.docker.com/userguide/
- 下面這條消息表示你已經成功安裝
2. 關於鏡像和容器
- 在上一部安裝中過程中, 你用Docke執行了
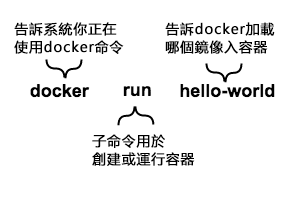
docker run hello-world的指令. 其實這一過程已經完成了Docker的核心任務. 該條指令分為了三個部分:

- 容器: Linux操作系統的最核心版本. (容器是由Linux內核提供的)
- 鏡像: 可加載到容器的軟件.
- 如果你執行該條指令, Docker會進行下面的步驟:
- 檢測你是否擁有
hello-world的鏡像 - 如果沒有, 則從Docker Hub上下載該鏡像下來 (後面會討論到Docker Hub)
- 把鏡像加載到容器中並執行
- 檢測你是否擁有
- 實際當中, 一個Docker鏡像可能只是像
hello-word鏡像一樣執行一條簡單的, 單一的指令, 然後退出. - 然而, 一個Docker鏡像可以承載更多的東西. 如一個鏡像可以啟動像數據庫一樣複雜的軟件, 然後進行操作數據並等待下一個人去操作數據.
- 那麼是誰創建了
hello-word鏡像呢? 在這個例子中, 是Docker創建的, 而且我們也可以自己創建自己的鏡像. 如果使用Docker, 你就能運行所有Docker鏡像中能運行的軟件.
3. 關於從Docker Hub找到鏡像
- 來自四面八方的人都在創建鏡像, 而你可以通過Docker Hub來找到這些鏡像.
步驟1: 定位你想要找的鏡像
- i. 打開瀏覽器並瀏覽Docker Hub.
- Docker Hub 包含私人鏡像以及像RedHat, IBM, Google或其他的.
- ii. 點擊搜索框
Browser & Search. - iii. 在搜索框輸入單詞
whalesay. - iv. 在結果列表中點擊
docker/whalesay鏡像.- 每一個鏡像倉庫都包含關於這個鏡像的信息. 這些信息應該包括镜像中包含哪種類型的軟件和如何去使用這個鏡像. 你會發現
docker/whale鏡像是基於Linux的一個發行版, Ubuntu. 下一步將會介紹如何去運行這個鏡像.
- 每一個鏡像倉庫都包含關於這個鏡像的信息. 這些信息應該包括镜像中包含哪種類型的軟件和如何去使用這個鏡像. 你會發現
步驟2: 執行Whalesay鏡像
- i. 在終端執行下面的命令:
- 第一次執行這個鏡像時, 這條指令會先查詢本地系統是否擁有這個鏡像. 如果鏡像不存在,
Docker會從Docker Hub上下載到本地$ docker run docker/whalesay cowsay boo
- 第一次執行這個鏡像時, 這條指令會先查詢本地系統是否擁有這個鏡像. 如果鏡像不存在,
- ii. 通過執行下面的命令來查詢本地含有哪些鏡像:
- 當你第一次在容器中執行一個鏡像且本地無該镜像时, Docker會下載該鏡像到你的電腦上. 這個本地的緩存將會大大節省你的時間. Docker只會在遠程的鏡像源產生改變時, 才會重新下載. 當然你也可以刪除你的鏡像. (刪除鏡像將會在後面介紹)
$ docker images
REPOSITORY           TAG         IMAGE ID            CREATED            VIRTUAL SIZE
docker/whalesay      latest      fb434121fc77        3 hours ago        247 MB
hello-world          latest      91c95931e552        5 weeks ago        910 B
- 當你第一次在容器中執行一個鏡像且本地無該镜像时, Docker會下載該鏡像到你的電腦上. 這個本地的緩存將會大大節省你的時間. Docker只會在遠程的鏡像源產生改變時, 才會重新下載. 當然你也可以刪除你的鏡像. (刪除鏡像將會在後面介紹)
4. 關於創建鏡像
Step1: 寫一個Dockerfile
i. 創建一個新的文件夾:
$ mkdir mydocker buildii. 在該文件夾新建一個文本文件叫
Dockerfile:- 一個
Dockfile用於描述備份在一個鏡像中的軟件, 可並不只是集成軟件. 它還可以繼承環境和命令, 且使得你的"烹飪菜單"也將會變得非常地簡短.$ cd mkdocker $ vim Dockerfile
- 一個
iii. 在文本文件中添加一行文本:
FROM關鍵字是告訴Docker這個軟件是基於哪個鏡像的. 由於Whalesay輕量且已經含有cowsay程序, 所以我們將從它開始.FROM docker/whalesay:latest
- iv. 添加
fortunes程序到鏡像中:fortunes程序中有一條命令用於輸出. 因此, 我們先安裝該程序.RUN apt-get -y update && apt-get install -y fortunes
- v. 當鏡像含有它需要的軟件時, 就可以指示鏡像加載時執行該程序:
- 這一行命令是告訴
fortune去傳遞一段名言到cowsay程序中.CMD /usr/games/fortune -a | cowsay
- 這一行命令是告訴
- vi. 保存並退出該文本文件.
- 此時, 你已經把所有的軟件集成和行為描述放在
Dockfile中.
Step2: 通過Dockfile來創建鏡像
現在, 通過在終端執行
docker build -t docker-whale .命令來創建鏡像(不要忘記 . ). (這命令需要一定的時間來輸出結果)Sending build context to Docker daemon 158.8 MB ...snip... Removing intermediate container a8e6faa88df3 Successfully built 7d9495d03763
Step3: 瞭解創建的過程
- 命令
docker build -t docker-whale .會在當前文件夾獲取Dockerfile, 然後在本機創建一個叫docker-whale的鏡像. 該命令需要一點時間來輸出, 而且輸出結果較長且複雜. 下面, 我們將會瞭解每一條信息, 它們的含義是什麼. 首先, Docker會保證所有需要的文件都配置好
Sending build context to Docker daemon 158.8 MB然後, Docker會加載
whalesay鏡像. 由於之前已經下載過該鏡像, 因此Docker將不會重新下載.Step 0 : FROM docker/whalesay:latest ---> fb434121fc77Docker下面會更新
apt-get安裝包管理器. 由於輸出結果較長, 這裡將不顯示所有的結果.Step 1 : RUN apt-get -y update && apt-get install -y fortunes ---> Running in 27d224dfa5b2 Ign http://archive.ubuntu.com trusty InRelease Ign http://archive.ubuntu.com trusty-updates InRelease Ign http://archive.ubuntu.com trusty-security InRelease Hit http://archive.ubuntu.com trusty Release.gpg ....snip... Get:15 http://archive.ubuntu.com trusty-security/restricted amd64 Packages [14.8 kB] Get:16 http://archive.ubuntu.com trusty-security/universe amd64 Packages [134 kB] Reading package lists... ---> eb06e47a01d2更新完安裝包管理器後, 將會安裝
fortunes程序.Removing intermediate container e2a84b5f390f Step 2 : RUN apt-get install -y fortunes ---> Running in 23aa52c1897c Reading package lists... Building dependency tree... Reading state information... The following extra packages will be installed: fortune-mod fortunes-min librecode0 Suggested packages: x11-utils bsdmainutils The following NEW packages will be installed: fortune-mod fortunes fortunes-min librecode0 0 upgraded, 4 newly installed, 0 to remove and 3 not upgraded. Need to get 1961 kB of archives. After this operation, 4817 kB of additional disk space will be used. Get:1 http://archive.ubuntu.com/ubuntu/ trusty/main librecode0 amd64 3.6-21 [771 kB] ...snip...... Setting up fortunes (1:1.99.1-7) ... Processing triggers for libc-bin (2.19-0ubuntu6.6) ... ---> c81071adeeb5 Removing intermediate container 23aa52c1897c最後, Docker完成創建並輸出結果
Step 3 : CMD /usr/games/fortune -a | cowsay
---> Running in a8e6faa88df3
---> 7d9495d03763
Removing intermediate container a8e6faa88df3
Successfully built 7d9495d03763
Step 4: 執行新的鏡像 - docker-whale
i. 查看所創建的新鏡像:
$ docker images
REPOSITORY           TAG          IMAGE ID          CREATED             VIRTUAL SIZE
docker-whale         latest       7d9495d03763      4 minutes ago       273.7 MB
docker/whalesay      latest       fb434121fc77      4 hours ago         247 MB
hello-world          latest       91c95931e552      5 weeks ago         910 B
ii. 通過輸入命令
docker run docker-whale來執行新的鏡像:$ docker run docker-whale
5. 關於建立倉庫
Step 1: 在Docker Hub上註冊一個帳號
Step 2: 驗證郵件並建立倉庫
6. 標記, 推送, 回拉鏡像
Step 1: 標記和推送鏡像
i. 列出你現在本機有的鏡像:
$ docker images
REPOSITORY           TAG          IMAGE ID            CREATED             VIRTUAL SIZE
docker-whale         latest       7d9495d03763        38 minutes ago      273.7 MB
<none>               <none>       5dac217f722c        45 minutes ago      273.7 MB
docker/whalesay      latest       fb434121fc77        4 hours ago         247 MB
hello-world          latest       91c95931e552        5 weeks ago         910 B
ii. 查找docker-whale
鏡像對應的IMAGE ID`.- 在這例子中, id為
7d9495d03763. - 你會發現當前
REPOSITORY字段顯示了docker-whale鏡像的repository, 但沒有顯示namespace. 你需要通過namespace來關聯帳戶.namespace跟你的帳戶名相同.
- 在這例子中, id為
- iii. 通過用
IMAGE ID和執行docker tag命令來標記docker-whale鏡像.

iii. 輸入
docker images命令去查看新標記的鏡像.$ docker images REPOSITORY TAG IMAGE ID CREATED VIRTUAL SIZE maryatdocker/docker-whale latest 7d9495d03763 5 minutes ago 273.7 MB docker-whale latest 7d9495d03763 2 hours ago 273.7 MB <none> <none> 5dac217f722c 5 hours ago 273.7 MB docker/whalesay latest fb434121fc77 5 hours ago 247 MB hello-world latest 91c95931e552 5 weeks ago 910 Biv. 輸入
docker login命令去登錄Docker Hub.docker login --username=yourhubusername --password=yourpassword --email=youremail@company.comv. 輸入
docker push命令去推送鏡像到倉庫.$ docker push maryatdocker/docker-whale The push refers to a repository [maryatdocker/docker-whale] (len: 1) 7d9495d03763: Image already exists c81071adeeb5: Image successfully pushed eb06e47a01d2: Image successfully pushed fb434121fc77: Image successfully pushed 5d5bd9951e26: Image successfully pushed 99da72cfe067: Image successfully pushed 1722f41ddcb5: Image successfully pushed 5b74edbcaa5b: Image successfully pushed 676c4a1897e6: Image successfully pushed 07f8e8c5e660: Image successfully pushed 37bea4ee0c81: Image successfully pushed a82efea989f9: Image successfully pushed e9e06b06e14c: Image successfully pushed Digest: sha256:ad89e88beb7dc73bf55d456e2c600e0a39dd6c9500d7cd8d1025626c4b985011
Step 2: 回拉一個新的鏡像
- 回拉鏡像之前一定要刪除原來在本地存在的鏡像. 如果不刪除, Docker Hub將不會下載新的鏡像到本地 — 為什麼呢? 因為兩個鏡像是相同的.
i. 使用命令
docker rmi去刪除鏡像maryatdocker/docker-whale和docker-whale.- 你可以用鏡像的ID或名字去刪除一個本地的鏡像.
$ docker rmi -f 7d9495d03763
$ docker rmi -f docker-whale
- 你可以用鏡像的ID或名字去刪除一個本地的鏡像.
ii. 使用
docker pull的回拉鏡像.- 命令中一定要含有在Docker Hub上的用戶名
$ docker pull yourusername/docker-whale
- 命令中一定要含有在Docker Hub上的用戶名
As the plugin is integrated with a code management system like GitLab or GitHub, you may have to auth with your account before leaving comments around this article.
Notice: This plugin has used Cookie to store your token with an expiration.